

And no I’m not talking about ‘kick the can’ or ‘elastics’ (the games we used to invent with used soda cans and bags of hair elastics)…I’m talking about inventive, educational, imaginative toys! Toys that inspire and toys that engage. That’s right – let’s have the kids make them. Why do we assume toys need to be mass produced in some factory across the ocean?
‘Cause that’s what the world’s marketing gurus have led us to believe. But a recent experience at my house has given me new insight into the toy world. I’ll admit my kids are getting older – and we don’t talk about toys much anymore – these days we talk about cars and cell phones and hockey and concerts.
But, my 20 year old daughter was recently challenged in her Cape Breton University 1st Year Engineering Course to design a child’s toy. Sure, there were parameters (it had to be safe) and there was a theme (space) – but other than that the sky was the limit, no pun intended. It was a project to challenge student creativity and design – and I’m going to tell you, inspire it did. Her ideas were impressive. She was engaged. She was chatting about features, and target markets, and educational value.
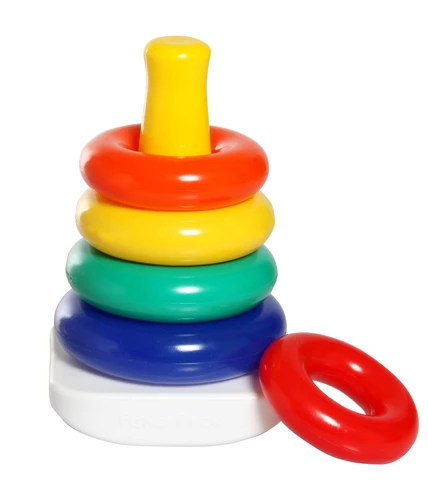
Then she remembered a simple toy from her childhood – one she was certain she could improve and add value to…now you may assume it was some electronic gadget or high tech creation – but no, she was thinking about the simple, plastic stackable ring toy. Remember that toy? The one pictured here is the Fisher Price Stackable Toy Rings. A set of rings that had to be stacked on the base and the order was key. The inside circles all had different widths.
She thought about this toy and how much fun it is for young children, but it really didn’t have much appeal as kids got older. But what if she took that simple stacking concept — and what if instead of a pyramid it was shaped into a rocket ship (space theme) and instead of colored rings – each level was named after one of the planets (educational). There would need to be 8 pieces, one for each planet. The rings would need to be stacked in a specific order – and the order would reflect the planets’ distance from the sun.


I could see her mind spinning as she tried to keep it simple – yet educational – and the idea for the stackable planet rocket ship was born – but her’s had a catch. The inside column would be stacked blocks and thus require more skill to assemble. This photo is the actual prototype she took to class. You can see it’s labelled and ready to go.
She then started talking about materials – while it was a design project (focussing on AutoCAD and 3d design) the students were also required to prepare a sample prototype out of simple materials (wood, cardboard, etc). She was contemplating using wood as her material of choice.
This is where I jumped in – and said ‘hey, we have a 3d printer – why don’t you try your hand at 3d printing? You’re using AutoCAD anyway, so you’ll have the designs.’
She’s always up for a challenge – so she happiky accepted the suggestion. She had wanted to try the 3d printer – and this would give her an opportunity.
I didn’t see the design over the next few weeks – until one day she had the sketches prepped and was ready to use the 3d printer.

I was impressed with the design sketch! She had even made the inside square imprad even made the inside square (to make the stacking a bit more difficult) and chose to color each of the blocks a color to reflect the color of the planet. In addition, there was a platform on which the ship balanced and a window so the astronauts could peer out into space.
Now, in my mind, I started thinking how great this would be for a high school class project to share with our Brilliant Labs community. But, as the program AutoCAD is expensive and has a bit of learning curve – I was worried it wouldn’t be as easy to share the ideas and inspire others to give it a try.
So I made one more suggestion – I asked that she do a second copy of the design in a fun, easy to use 3d design program called BlocksCAD. That way, once she completed the drawings we could use the original files for demonstrations in schools. BlocksCAD is available online at www.blockscad.com It’s free and easy to use. (Don’t worry, it wasn’t much more work for her – she’d already built everything in AutoCAD and had all the numbers calculated – and BlocksCAD is so simple it literally took 6 minutes to give her a full tutorial.)
I’m not kidding – I had her log on to BlocksCAD and showed her in less than 6 minutes how to create a file, export it to the computer and import it to the printer.

And then it was off to start the printer. Brianna’s design included plans to color each layer a different color with the name of each planet on each layer. But, we didn’t have that many colors at home, so the prototype features only 2 shades of blue (and in the interests of time the names of the planets were added to the sticker rather than add them to the 3d design).

Brianna used the Micro M3D printer for this job. https://printm3d.com/themicro/ It’s a very user friendly inexpensive printer. There’s very little to adjust (I always have the computer recalibrate (adjust) the printhead before every print job. It only takes a few minutes and can save lots of frustration with failed prints. So, I recommend it! Unfortunately it is a very slow printer. We definitely trade speed for affordability…but hey, there’s a lesson in there too. Life’s about tradeoffs.

When setting to print, you’ll notice she used lots of green painters’ tape. It is a good idea to put the layer of tape on the base of the plate to make removal easier later on (this is especially important for printers that do not have a heated base plate).
Here you will see the inside section of the stacking column as it is being printed. You will note, that this is a small printer, so she needed to print the base and column in two prints and glue them together as one piece when they finished printing.

Here are a couple of the first parts completed. You will notice some lines in the object. There are a number of reasons for this – first the quality of the print selected. When sending a file to print you have a choice of print quality (just like a traditional ink jet printer) but it is another tradeoff. The higher quality print – the longer the print will take. So, to be sure to have all items completed and ready to pass in for grading Brianna chose the medium print quality. In this case, that was the best decision for her. As this was a prototype it didn’t need to be perfectly smooth and polished. Plus, if you’re printing the first run – it is a good idea to be sure your design is perfect and all the pieces fit together before you commit too much time to the printing process.


Here we’ve stopped the print midway – so you get a chance to see inside the printed object. How cool is the honeycomb pattern? This is a way to add strength to a design without necessarily having to fill in the entire object with filament. The outside edges, top and bottom are solid and yet the inside is a honeycomb fill.

Let me tell you – 3d printing is lots of fun and very cool – but it is not quick! Brianna spent the better part of two days printing, tweaking, reprinting, sanding and gluing the final product! But it sure was a great learning experience – (although we weren’t able to eat at the dining room table for a couple of days)! She was ready to present at class just in the nick of time.

Now, you may be already thinking about how you can have your students build a toy. How can you inspire their creativity and give them time to develop their ideas? And of course, where could it fit in the curriculum. We’ve thought of a few possible curriculum links:
Design 11 – depending on the magnitude and type of the item designed and printed, this activity would support a large part of the Design 11 course.In addition, it could address Aesthetic Expression, Citizenship, Communication, Problem Solving, and Technological Competence areas within the Essential Graduation Learnings.

Technology Education 9 – this activity would support parts of Module 3 (Inventions and Innovations) and Module 4 (Production Technology).And of course, it’s a natural with
Entrepreneurship 12 – depending on the item designed and created, specifically the following:generate ideas and identify entrepreneurial opportunities plan, implement, and evaluate a business or venture demonstrate an understanding of the role of technology and its application to entrepreneurship.These are but a few of the endless ways to integrate imagination, design, and making in the classroom.
And there she is – hot off the press! The first stackable rocket prototype designed and printed by Brianna. It certainly was an ambitious project to start with but it was a fabulous learning experience (she also had to submit AutoCAD files and a complete report on her research and design process) but, in case you’re wondering, she got a well-deserved A on her first engineering design project! Congratulation Brianna keep up the great work!
Please let us know how you were able to integrate it into your classroom. And if you need support with either design, BlocksCAD, 3D printing or any other topic, please reach out to us at BrilliantLabs.ca.


